
In this post, we’ll show you how to wrap a circular gift step-by-step, and also show you five more methods.
The simplest boxes to wrap are squared-shape and rectangular ones; wrapping circular gifts can be challenging but is not always impossible.
Our team will show you how to wrap a circular gift because it can be tricky to wrap a gift with circular edges because the wrapping style adds impressions to the gift.
Table of Contents
Circular and Cylindrical
Let’s define what we mean by “circular gifts” first. As you probably already guessed, we view circular gifts broadly, but we are also including cylindrical gifts in our definition of circular gifts. Since cylindrical gifts have a tube shape and circular ends (at the top and bottom), they are still considered to be circles or at least closely related to them.
Having said that, we will cover both a section on how to wrap a simple flat circular gift, such as a tin of cookies, and a section on how to wrap a more cylindrical gift, such as a candle. It should be noted that the term “circular” typically refers to flat objects with a circle shape. Items such as basketballs are, strictly speaking, spherical objects and will not be mentioned in this article
6 Steps on How to Wrap a Circular Gift
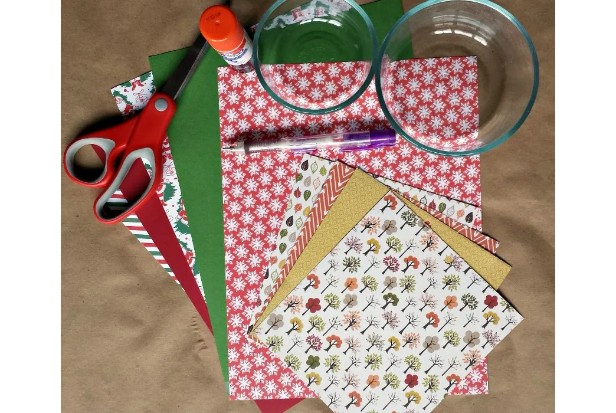
1. Gather & Prepare the Things Needed
Gathering and preparing the materials you will need for the wrapping task is the first step in the gift-wrapping process. You’ll need wrapping paper, double-sided tape, ribbons, scissors, and gift toppers.
When it comes to gift wrappers, it’s important to choose thick and sturdy papers to make it simpler for you to form pleats and prevent accidental tearing. Additionally, especially if this is your first time, you will need to have a ton of patience when it comes to wrapping circular gifts.
2. Place Your Gift in the Center of Your Wrapping Paper
Obtain the wrapping paper and place the gift in the center after gathering all the necessary items. You can adjust the gifts and get the ideal cutting width by centering the gift on the wrapping paper. Additionally, centering the gift would make it simpler to fold the sides of the wrapping paper.
3. Fold the Sides of the Wrapping Paper
Place the circular items on a piece of wrapping paper, then begin to wrap it by reaching across the gift and pulling the long edge of the paper to fold it. A round gift should have enough paper to extend to the center. Depending on the size of the circular object, you can fold it in small or large ways.
4. Pull Up & Tape the Bottom Flap
Hold the side flaps very high and against the center after folding the last few sides. Take the bottom flap and press it up against the entire gift at the same time. You will see that there will be a crease at the bottom. Avoid using double-sided tape because a small piece of adhesive tape will hold it in place just as well.
5. Repeat the Process on the Other Side
Take the other curved side of the round gift after the first curved side has been wrapped, and repeat holding, folding, and taping.
There will likely be crinkles on the corners of spherical gifts because they have round edges as opposed to other types of presents. Trim the necessary areas, and gradually pull out the crease on the corners to make it look neat.
6. Tie Or Tape the Excess Paper for a Secure Finish
Before attaching the gift tag, you must finish the wrapping process by securing the finish with a ribbon or piece of tape. The flat sides of the item should have all the creases covered by a small piece of tape or ribbon. Continue wrapping the gift on the opposite side.
5 Methods You Can Try
Learn How to Wrap a Cylinder Gift
1. the Twist Method
For a cylindrical gift, the twist method is simple, but it also works with round objects because it is similar to the tissue paper method in that regard.
Wrapping paper or tissue paper should be spread out, rolled up to the top edge, and finished with tape or glue.
Once the wrapping paper is fastened, deal with both sides by twisting each end individually, then fasten it with a ribbon.
2. the Outer Box
According to a professor of marketing at SMU in Dallas, receiving a gift that has been wrapped in a bow makes people feel better about getting it.
Measure the item to ensure that it will fit in the box before purchasing one; if it is a little loose, you can add bubble wrap or packing peanuts. Afterward, cover the box with the sheet of your choice after placing the gift inside. Add a ribbon or bow if you want to go the extra mile.
3. the Pleat Method
Because you have to deal with one edge at a time, the pleat technique works well with cylindrical gifts. Lay the sheet flat in the wrapping paper of your choice, roll the cylinder gift, and tape it shut.
To make sure the gift is hidden, fold the edge in a pleated pattern. Repeat it on the opposite end, then use the adhesive band to fasten both sides.
4. the Tissue Paper Method
Use tissue paper to wrap your circle-shaped gift if you’d rather not use wrapping paper or boxes. Measure the object from all angles after obtaining the tissue paper.
Pull the tissue paper over the object until it completely encloses it. To add a decorative element to your gift, tie a bow using a ribbon.
5. the Gift Bag Method
Using the gift bag technique, you can avoid measuring, folding, and wrapping if you received the presents at the last minute. The benefit of the gift bag is that any gift shape can be placed in it because it fits snugly. Simply check to see if the item will fit in the bag and that the bag design fits the theme.
How to Wrap a Biscuit Tin
To get started, you’ll need a few small components. After that, you can follow our simple, step-by-step instructions.
What you need:
- Wrapping paper
- Double-sided sticky tape
- Scissors
- Decorations (optional)
STEP 1: Apply double-sided tape after folding down one short edge. Apply tape to the paper’s rounded edge after wrapping it around it.
STEP 2: The paper should now be folded down in a pleating motion. Circulate around the tin’s one side.
STEP 3: Once finished, cover any messes with wrapping paper in the shape of a rounded disk and seal with adhesive tape.
STEP 4: Continue on the opposite side.
To decorate: Of course, add some ribbon!
Extra Tips for Wrapping Round Gifts
- Use a gift bag instead of tissue paper or wrapping paper when you are wrapping delicate round gifts because they may get damaged.
- To prevent accidentally opening filled jars, seal the lid with clear tape or cling wrap on the curve side.
- Use the candy wrapper fold to seal the contents when wrapping bowls.
- When creating pleats, foil wrapping is a bad idea.
- Consider the specifics of the wrapping paper when choosing ribbons to ensure a good match.
Wrapping Up
Gift wrapping can bring back pleasant memories and improve our mood, but how can you wrap a circular gift without getting impatient?
Especially for a beginner, wrapping a circle-shaped object is difficult. Fortunately, we put together a thorough guide to assist you in wrapping circular objects.
Was it simple for you to follow our instructions? Comment below and let us know.
FAQs
How Do You Wrap a Round Object With Fabric?
Place the circle object in the center of the flattened fabric to wrap it around it. Take the two corners that are opposite one another and tie a double knot. Continue on the other side, then twist the two ends together to form a handle.
How Do You Cover Rounded Corners With Fabric Wrappers?
Using a ribbon or bow, you can conceal rounded corners with fabric wrappers. On the other hand, you can omit that step because fabric makes a lovely fold that goes well with round objects. To make it more attractive, just make sure to carefully fold the corners.